If you’re tired of dealing with the pesky discomfort of running shoes, we’re here to help.
Lace-related discomfort is a common issue many runners face, but fret not because we’ve got you covered.
In this article, we’ll provide you with some handy tips on how to lace your running shoes to prevent any unnecessary discomfort, ensuring a smooth and enjoyable running experience.
Say goodbye to blisters and sore feet, and say hello to a more comfortable stride! So, let’s start lacing up in a way that will drive you towards a pain-free future.
Different Lacing Techniques
Crisscross Lacing
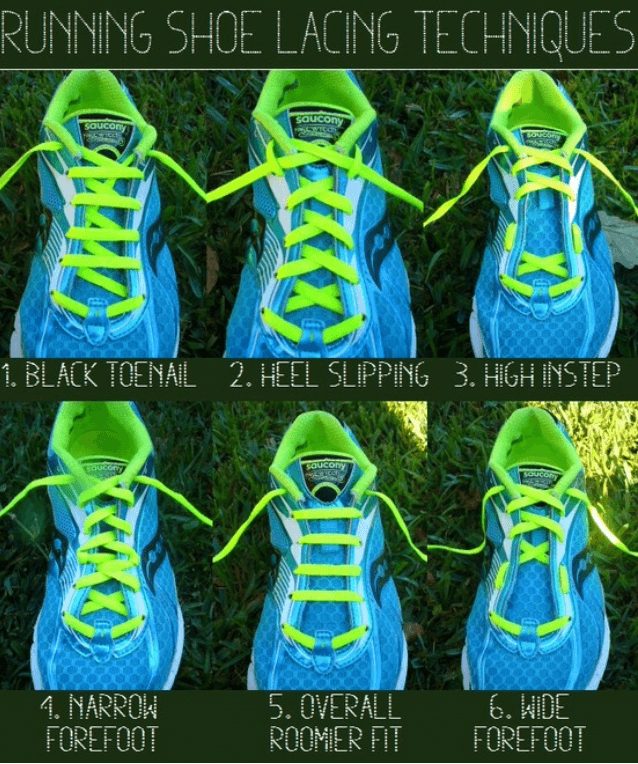
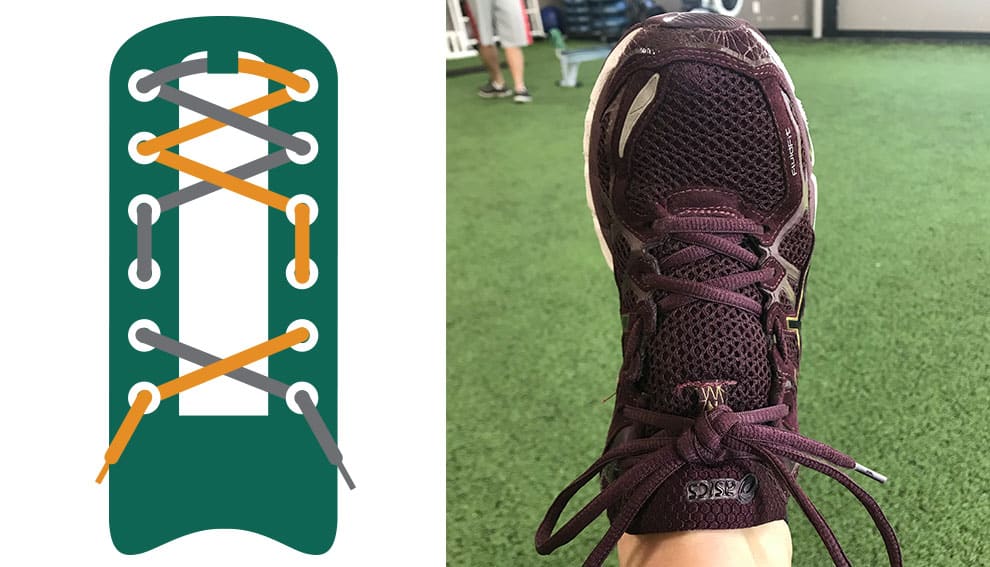
One of the most common lacing techniques is the crisscross lacing. This method provides a secure and even pressure distribution across the shoe, ensuring a snug fit. To use this technique, start by inserting the lace through the bottom eyelets and cross them over each other, going up to the next set of eyelets. Repeat this crisscross pattern until you reach the top of the shoe, making sure to pull the laces tight but not overly so. Tie a bow or knot at the top to secure the laces.
Straight Bar Lacing
Straight bar or fashion lacing is a simple but effective technique that works well for narrow or high-footed individuals. It helps to distribute pressure evenly across the shoe and reduces the chances of discomfort.
To lace your shoes using this method, insert the lace through the bottom eyelets and bring them up on the same side, creating a straight bar. Cross each lace over the bar and insert them into the opposite eyelets, repeating this pattern until you reach the top of the shoe. Tie a secure knot at the top to complete the lacing.
Loop Lacing
Loop lacing is valuable for individuals with pressure points on the top of their feet or who have wider forefeet. This technique helps alleviate discomfort by providing more room and reducing pressure on sensitive areas.
To use loop lacing, start by lacing the shoe regularly until you reach the area where you want to create a loop. Instead of crossing the laces, thread each lace through the next two eyelets on the same side, creating a loop or gap. Continue this process until you reach the top of the shoe, tying the laces securely at the end.
Runner’s Loop Lacing
Runner’s loop lacing is specifically beneficial for runners who experience heel slippage or want to achieve a more secure fit. This technique helps to hold the heel in place and prevent excessive movement while running.
To achieve runner’s loop lacing, start by lacing the shoe generally until you reach the second-to-last set of eyelets. Instead of crossing the laces over, thread each lace through the loop created between the eyelets and the second-to-last set of eyelets. Repeat this process on both sides and tie the laces firmly at the top.
Locked Heel Lacing
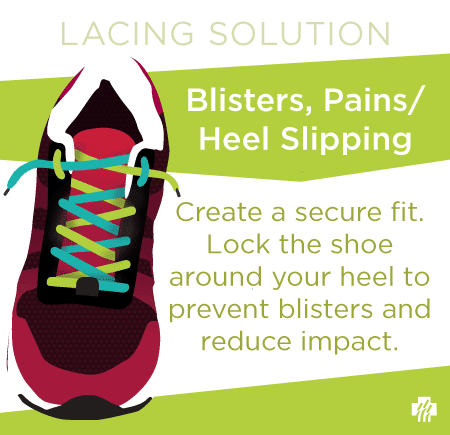
Locked heel lacing is ideal for individuals who struggle with heel slippage or need additional stability in the heel area. This technique helps secure the heel in place and prevents unnecessary movement.
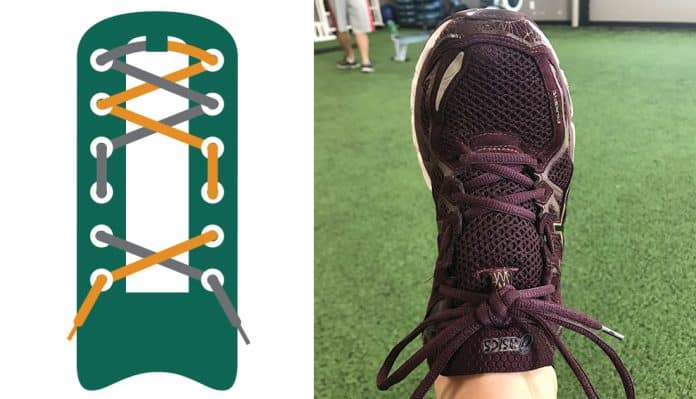
To lock your heel using this technique, insert the lace through the bottom eyelets and cross them over each other, going up to the next set of eyelets. Instead of continuing with a regular crisscross pattern, bring each lace through the adjacent loop on the same side, forming a lock. Repeat this pattern until you reach the top of the shoe and tie the laces securely.
Window/Ladder Lacing
Window or ladder lacing is a versatile technique that allows customizable fit and increased support. It is particularly beneficial for individuals with narrow heels or requiring a more secure fit in the midfoot area.
To use this technique, start by lacing the shoe generally until you reach the area where you want to create a window or ladder. Instead of crossing the laces over, thread each lace vertically through the next set of eyelets on the same side, alternating sides as you go up. Repeat this pattern until you reach the top of the shoe, tying the laces securely at the end.
Hidden Knot Lacing
Hidden knot lacing is a practical technique for preventing your shoe knot from getting untied while running or engaging in physical activities. It helps ensure a secure fit and eliminates the risk of tripping over loose laces. To achieve hidden knot lacing, start by lacing the shoe generally until you reach the final set of eyelets. Instead of tying a regular knot, create a loop with each lace and tuck it into the top set of eyelets. This will keep the knot hidden and secure while providing a clean, streamlined look.
Proper Fit and Sizing
Choosing the Right Size
Choosing the right size for your running shoes prevents discomfort and foot-related issues. To determine the correct size, having your feet measured by a professional or using a dedicated measuring tool is recommended. Consider the width of your feet, as many running shoe brands offer various options. Leaving some room in the toe box is essential to accommodate any swelling during physical activity. However, ensure that the shoes are not too loose, which can cause blisters and instability.
Heel Lock Technique
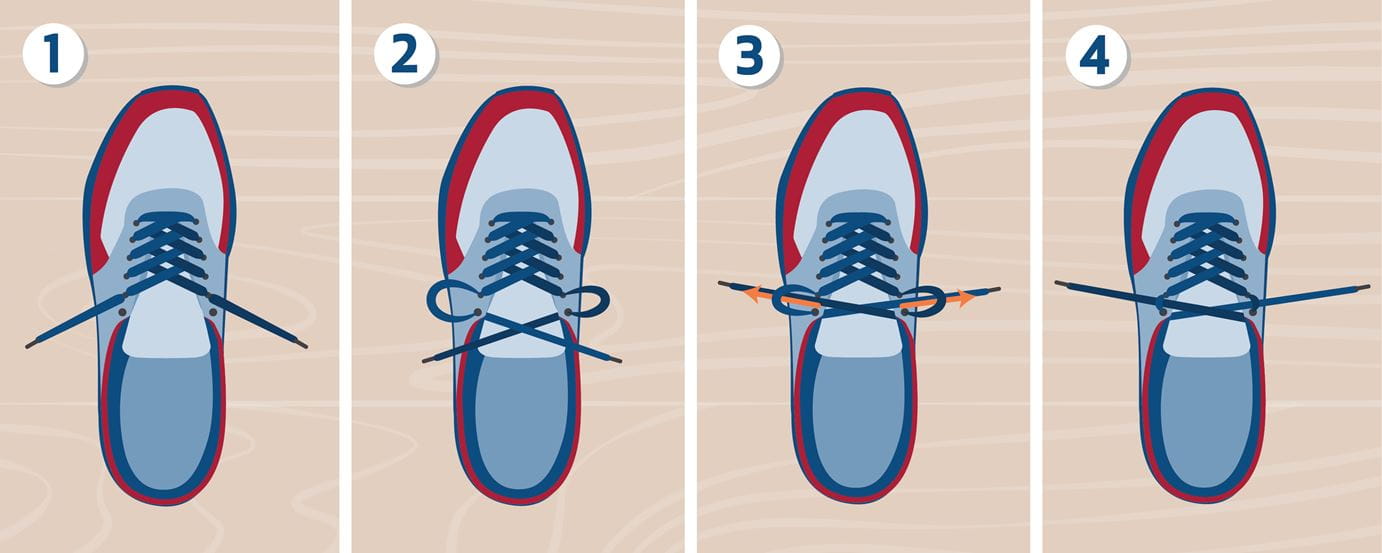
The heel lock technique is a great way to secure your foot in the shoe and prevent heel slippage. To achieve a heel lock, lace your shoes until you reach the final set of eyelets. Instead of tying a regular bow or knot, create two loops with each lace and cross them over each other. Then, thread each lace through the opposite loop and pull tight. This creates a strong and secure lock around the ankle and heel, reducing the chances of discomfort and blisters.
Toe Box Space
Enough space in the toe box is essential for preventing discomfort and potential foot issues such as blisters and black toenails. When selecting your running shoes, ensure ample room for your toes to wiggle and move freely.
Your toes should not feel cramped or pressed against the front of the shoe. Remember that your feet may swell during physical activity, so leave some extra space to accommodate this. A roomy toe box will provide better blood circulation and reduce the risk of toe-related issues.
Reducing Pressure Points
High-Arching Feet
Individuals with high-arching feet often experience pressure points on specific areas of the foot. To reduce discomfort, it is recommended to use lacing techniques that allow for more adjustability and customization. Crisscross lacing with gap lacing in the pressure area can help alleviate the pressure points by providing extra space. Additionally, ensuring the shoe has sufficient arch support will help distribute pressure more evenly and reduce strain on the arches.
Flat Feet
Individuals with flat feet need to find shoes that offer proper arch support and stability. Lacing techniques such as crisscross lacing and straight bar lacing can help provide a secure fit and reduce discomfort. Choosing shoes with built-in arch support or using orthotic inserts to provide additional support to the foot is also beneficial. The goal is to ensure the foot arch is adequately supported and aligned, reducing pressure points and discomfort.
Bunions
Bunions are a common foot condition that can cause discomfort and pain while running. When lacing shoes to accommodate bunions, creating a customizable fit that relieves pressure on the affected area is essential. Loop or gap lacing in the bunion area can help create extra room and reduce friction. Additionally, choosing shoes with a wider toe box can provide more space for the bunion, reducing discomfort and irritation.
Morton’s Neuroma
Morton’s neuroma is characterized by thickened tissue around the nerves leading to the toes, often causing pain and discomfort. Choosing shoes with a wider toe box to reduce compression and irritation is essential to alleviate discomfort associated with Morton’s neuroma. Techniques such as crisscross or loop lacing can also help alleviate pressure and provide extra room for the affected area. Additionally, cushioned insoles can provide additional support and reduce impact on the foot.
Wide Forefoot
Individuals with wide forefeet may experience discomfort and pressure points due to narrow shoes. To alleviate this, choosing shoes specifically designed for wider feet or having a removable insole that allows for extra width is essential. Techniques such as loop or window/ladder lacing can also help create a more adjustable fit and alleviate discomfort by providing more room in the forefoot.
Narrow Heel
A narrow heel can often lead to heel slippage and instability while running. Choosing shoes with a secure heel counter that provides stability and support is essential to address this issue. Lacing techniques such as the heel lock and parallel lacing can help secure the heel in place, reducing slippage and discomfort. Additionally, thicker or cushioned socks can help fill gaps and provide a more snug fit for narrow heels.
Reducing Heel Slippage
Heel Lock Technique
As discussed earlier, the heel lock technique effectively reduces heel slippage and provides a more secure fit. By creating a solid lock around the ankle and heel, this lacing method prevents excessive movement and discomfort. It benefits individuals with a narrow heel or those who experience heel slippage during physical activities. Practice the heel lock technique by following the steps mentioned in the “Proper Fit and Sizing” section.
Runner’s Loop Lacing
Runner’s loop lacing, mentioned in the “Different Lacing Techniques” section, is another effective method to combat heel slippage. Creating loops between the eyelets and the second-to-last set of eyelets helps secure the heel and prevent excessive movement. By incorporating runner’s loop lacing into your shoe lacing routine, you can enjoy a more stable and comfortable running experience.
Parallel Lacing
Parallel lacing is a technique that can help reduce heel slippage by providing an evenly distributed lockdown. It involves lacing each lace on parallel paths, allowing for a customizable fit and enhanced stability.
To utilize parallel lacing, begin by usually lacing the bottom eyelets of your shoe. Then, instead of crossing the laces over, thread each lace vertically through the next set of eyelets, creating parallel lines. Continue this pattern until you reach the top of the shoe, ensuring a snug fit. Tie the laces securely to maintain the desired tension.
Preventing Toe Blisters and Black Toenails
Roomy Toe Box
As mentioned in the “Proper Fit and Sizing” section, having a roomy toe box prevents toe-related discomfort and issues. Allowing your toes enough space to move freely reduces the risk of blisters and black toenails. When selecting running shoes, prioritize options with wider toe boxes to accommodate the natural movement of your toes. Avoid shoes that feel overly tight or cramped in the toe area, leading to friction and discomfort during long runs or intense workouts.
Lacing Techniques
Specific lacing techniques can also help prevent toe blisters and black toenails. Techniques like loop or gap lacing create more space in the toe box, reducing the chances of friction and pressure points. By providing additional room for the toes to move and breathe, these lacing techniques contribute to a more comfortable and blister-free running experience. Experiment with different lacing methods until you find the one best suits your foot shape and preferences.
Blister Prevention Products
Consider using blister prevention products such as toe caps, guards, or blister patches to protect your toes further and prevent blisters. These items provide an extra layer of cushioning and protection, reducing the friction between your toes and the shoe. Apply these products before your run or workout to ensure optimal comfort and blister prevention. Additionally, wearing moisture-wicking socks made from breathable materials can help keep your feet dry and reduce the risk of friction-related blisters.
Fighting Foot Fatigue
Midfoot Lock Lacing
Midfoot lock lacing is a technique that can help fight foot fatigue by providing additional support and stability to the midfoot area. By securing the middle section of your foot, this lacing method reduces the chances of excess movement and fatigue during running or exercise. To utilize midfoot lock lacing, start by lacing your shoes usually. Once you reach the middle section of the shoe, create two loops with each lace and cross them over each other. Then, thread each lace through the opposite loop, firmly locking the midfoot area. Continue lacing the rest of the shoe generally until reaching the top, and tie the laces securely.
Runner’s Loop Lacing
Runner’s loop lacing, mentioned earlier, can also contribute to fighting foot fatigue. By holding the heel securely in place, this technique reduces unnecessary movement and stabilizes the foot. A stable foot position allows for more efficient energy transfer and reduces the strain on various foot muscles. Incorporate the runner’s loop lacing into your shoe-lacing routine to enjoy improved foot support and reduced fatigue during your runs or workouts.
Straight Bar Lacing
Straight bar lacing is another technique that can help fight foot fatigue by providing support and stability. By evenly distributing pressure across the top of the foot, this lacing method reduces discomfort and relieves fatigue.
To utilize straight bar lacing, start by lacing your shoes generally until you reach the middle section. Instead of crossing the laces over, create a straight bar by lacing each lace up the same side, parallel to each other. Continue lacing the rest of the shoe generally until reaching the top, and tie the laces securely.
Addressing Achilles Tendon Issues
Diagonal Lacing
Diagonal lacing is an effective technique for addressing Achilles tendon issues by reducing pressure on the back of the ankle. By lacing the shoe diagonally, this method allows for a more customizable fit and alleviates discomfort. To use diagonal lacing, start by lacing your shoes generally until you reach the area around the Achilles tendon. From there, crisscross the laces diagonally, threading each lace through the next set of eyelets on opposite sides. Continue this diagonal pattern until you reach the top of the shoe, tying the laces securely.
Parallel Lacing
As a method to reduce heel slippage, parallel lacing can also help address Achilles tendon issues. This lacing technique prevents excess movement and minimizes strain on the Achilles tendon by providing a more secure fit around the heel and ankle. Implement parallel lacing into your shoe lacing routine for enhanced support and reduced discomfort in the Achilles area.
Heel Lock Technique
The heel lock technique discussed earlier is another valuable method for addressing Achilles tendon issues. Securing the heel and preventing excessive movement reduces strain on the Achilles tendon and helps alleviate discomfort. Practice the heel lock technique by following the “Proper Fit and Sizing” instructions.
Easing Arch Pain
Gap Lacing
As a technique to address high-arching feet, gap lacing can also help ease arch pain. This lacing method reduces pressure and friction on the arch by providing extra room in the arch area, alleviating discomfort. Incorporate gap lacing into your shoe lacing routine to enjoy a more customized and comfortable fit.
Straight Bar Lacing
Straight bar lacing, discussed as a flat-foot technique, can also contribute to easing arch pain. By distributing pressure evenly across the top of the foot, this lacing method promotes proper alignment and reduces strain on the arch. Practice straight bar lacing for enhanced arch support and reduced arch-related discomfort.
Crisscross Lacing
Crisscross lacing, previously mentioned as the most common technique, can also help ease arch pain. By evenly distributing pressure across the foot, this lacing method minimizes strain on the arch and reduces discomfort. Implement crisscross lacing into your shoe lacing routine to enjoy improved arch support and relief from arch pain.
Enhancing Ankle Support
Heel Lock Technique
As a method to prevent heel slippage, the heel lock technique also enhances ankle support. By securing the heel and reducing excessive movement, this lacing technique stabilizes the ankle and reduces the risk of injuries. Practice the heel lock technique to improve ankle support and stability during physical activities.
Parallel Lacing
As discussed earlier, parallel lacing can also enhance ankle support by providing a more secure fit around the ankle area. By creating parallel lines across the shoe, this lacing method adds stability and reduces unnecessary movement. Incorporate parallel lacing into your routine to enjoy enhanced ankle support and minimize the risk of ankle-related discomfort or injuries.
Window/Ladder Lacing
Window or ladder lacing, previously mentioned as a customizable technique, is another effective method to enhance ankle support. By creating vertical lines around the shoe, this lacing method improves stability and reduces the chances of ankle injuries. Utilize window/ladder lacing for increased ankle support and security.
Preventing Foot Numbness
Runner’s Loop Lacing
Runner’s loop lacing, while primarily used to prevent heel slippage, can also help prevent foot numbness. This technique promotes proper blood circulation throughout the foot by holding the heel securely in place, reducing the chances of numbness. Implement runner’s loop lacing into your shoe lacing routine to enjoy improved blood flow and minimize foot numbness.
Crisscross Lacing
Crisscross lacing, mentioned earlier as the most common technique, can also assist in preventing foot numbness.
By providing a secure fit and reducing pressure points, this lacing method promotes blood circulation and minimizes the chances of numbness. Practice crisscross lacing to enhance blood flow and prevent foot numbness during running or physical activities.
Toe Box Adjustment
Adjusting the fit of the toe box area can also help reduce foot numbness. If you experience numbness in the front of your foot, loosen the laces in the toe box area to provide more room.
Ensuring sufficient space for proper blood circulation can alleviate foot numbness and increase overall comfort. Experiment with different lacing techniques and adjustments to find the optimal fit for your feet and prevent numbness.
By utilizing different lacing techniques, achieving the proper fit and sizing, addressing specific foot issues, and enhancing support in critical areas, you can prevent discomfort and promote a more enjoyable running experience.
Adjust your lacing technique and fit as needed, ensuring that your shoes provide the support and comfort your feet require.

